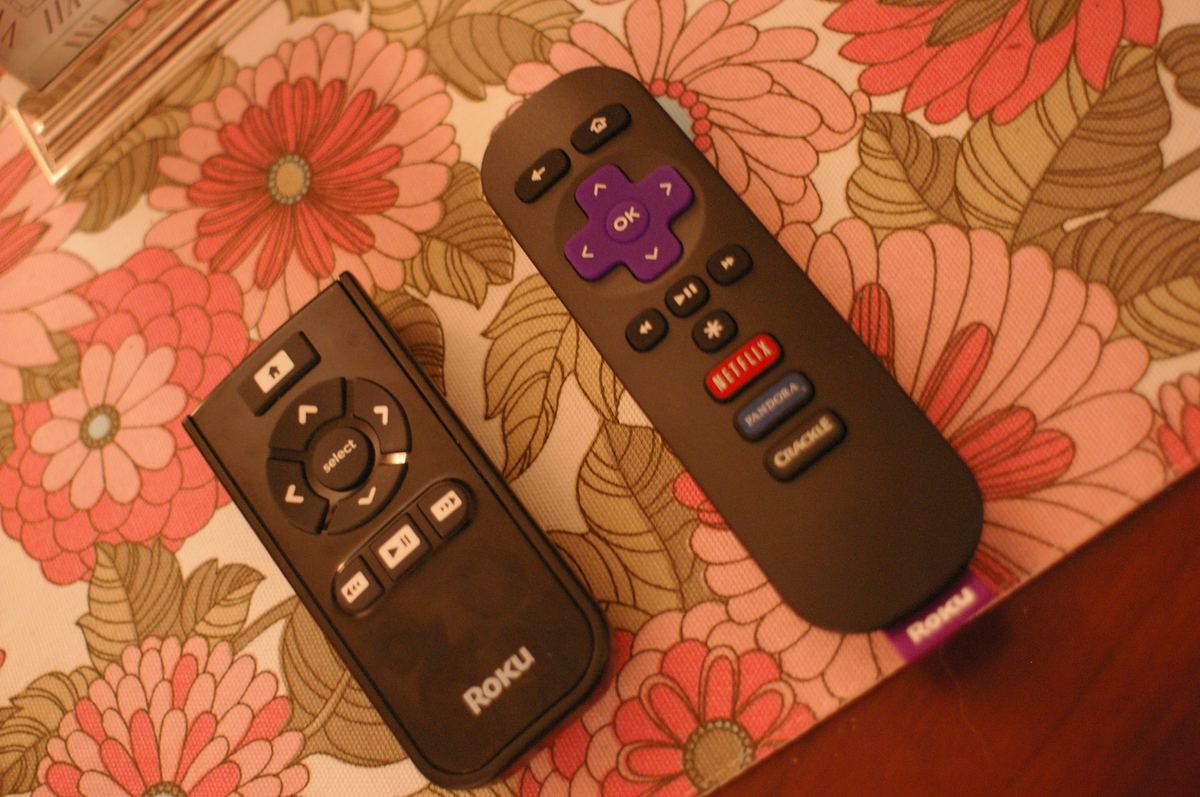
Here’s the thing almost every “fix your remote” article gets wrong: it hands you a list of ten steps and hopes one of them lands. But a roku remote not working isn’t one problem — it’s two completely different problems wearing the same T-shirt, and the fix you need depends entirely on which remote is sitting in your hand. Get that wrong and you’ll spend twenty minutes holding down a pairing button your remote doesn’t even have. Let’s not do that. Let’s figure out which Roku you’re holding first, and then everything downstream gets simple.
- Roku ships two remote types, and the correct fix is different for each — figuring out which one you own is genuinely step one, not an afterthought.
- No pairing button anywhere on it? You’ve got an infrared (IR) remote. Pairing screens won’t help you — it’s a batteries, line-of-sight, or obstruction problem.
- Got a mic/voice button and a pairing button? That’s an enhanced RF remote. Hold that pairing button about 5 seconds to re-handshake with your Roku.
- The nuclear reset that clears most stubborn cases: batteries out for a full 60 seconds, unplug the Roku for 10, then power both back up together.
- Volume and power buttons dead but the arrows still work? That’s a separate TV-side subsystem — nothing to do with pairing.
Why Your Roku Remote Has a Split Personality Problem
Before you touch a single button, you need to know this: Roku has sold two families of remotes for years, and they don’t fail the same way or fix the same way. This is the whole ballgame.
The first family is the simple IR remote — the plain one. It talks to your Roku the way an old TV clicker does: a beam of infrared light that has to travel in a straight, unobstructed line from the front of the remote to the little IR window on your Roku player. No Wi-Fi, no pairing, no memory of your device. Point it, click it, done. And critically — it has no pairing button anywhere.
The second family is the enhanced remote (Roku calls the fancier ones “Voice Remote” and “Voice Remote Pro”). These don’t use line-of-sight at all. They talk over a private wireless link — RF, essentially Wi-Fi Direct — which is why you can bury your Roku behind the TV and still change the channel. But that private link has to be established first. That’s what pairing is. And that’s why these remotes have a pairing button (usually tucked in the battery compartment or on the back) that the simple remote doesn’t.
So the reason a roku remote not working fix goes sideways is almost always this: people apply enhanced-remote solutions to an IR remote, or vice versa. Re-pairing an IR remote is like re-entering a Wi-Fi password on a device that connects by Bluetooth — it’s not that it’s hard, it’s that it’s the wrong action for the hardware.
Tip: The fastest way to tell your remotes apart without flipping them over: look for a microphone/voice button or dedicated streaming-service shortcut buttons (Netflix, Disney+, and the like) on the face. Those only live on enhanced remotes. A plain remote with just a D-pad and playback controls and no mic is an IR remote — and it will have no pairing button to hunt for.
How to Instantly Tell Which Roku Remote You Own

Don’t guess. Thirty seconds of looking saves you from chasing the wrong fix. Check these in order and you’ll know exactly which camp you’re in.
Check the Battery Compartment for a Pairing Button
Pop the back cover off and look inside the battery bay, then check the very bottom of the remote. If there’s a small recessed button — often with a circular “pairing” or reset icon next to it — you’re holding an enhanced RF remote, and pairing is a real tool in your kit. If you look everywhere and there’s simply no button, stop looking: it’s an IR remote, and you’ve just ruled out half the internet’s advice.
Look for a Microphone or Voice Button on the Face
Enhanced remotes have a microphone. If there’s a button with a little mic icon, or you remember pressing a button to say “play the news,” that’s an enhanced remote — full stop. A simple IR remote has no mic, no voice, nothing to talk into.
Notice Whether Line of Sight Ever Mattered
Think back to how the remote behaved when it did work. Did you have to point it at the TV, and did it stop working when someone stood in front of the Roku? That’s classic IR behavior. If you could fire it from across the room, upside down, with the Roku hidden in a cabinet — that’s RF, and you’ve got an enhanced remote.
Keep in mind: Roku TVs (the TCL, Hisense, and Onn sets that run Roku built in) almost always ship with an enhanced remote, because there’s no separate box to point at. Standalone Streaming Stick and Express players are the ones most likely to come with a simple IR remote. Knowing your device narrows it down before you even open the battery door.
Fixing an Enhanced Roku Remote That Stopped Responding
If you’ve confirmed you have the enhanced RF remote, the wireless handshake between remote and player has dropped, and you need to rebuild it. Work these in order — the earlier steps clear the majority of cases, so don’t jump to the hard reset first.
Re-Pair It by Holding the Pairing Button
This is the single most effective move for an enhanced remote. Make sure the Roku is powered on and showing the home screen, then press and hold the pairing button (in the battery compartment or on the back) for about 5 seconds until the remote’s light starts flashing. Give it 30 seconds or so — a “pairing…” message should appear on screen and then confirm. That flashing light isn’t a fault; it’s the remote actively searching for its player.
Fix: If holding the pairing button does nothing at all, swap in genuinely fresh batteries before you assume the remote is dead — a remote too weak to pair still has just enough juice to light up, which fools people into thinking batteries aren’t the issue. Weak batteries are the number-one reason a re-pair silently fails.
Do the Full 60-Second Power-Cycle Reset
When a simple re-pair won’t take, the remote and the Roku need to forget each other and start clean. Here’s the sequence that actually works: take the batteries out of the remote and set them aside for a full 60 seconds — not five, sixty. While they’re out, unplug the Roku from power for about 10 seconds and plug it back in. Wait for it to fully boot to the home screen, then reinsert the batteries. The remote should re-enter pairing mode on its own; if not, hold the pairing button again.
Note: The 60-second wait isn’t superstition. It gives the remote’s internal circuitry time to fully discharge and drop its stale connection state, so it comes back up genuinely fresh instead of trying to resume the broken link. Rushing this is why “I already tried taking the batteries out” so often doesn’t work — five seconds isn’t enough.
Use the Roku Mobile App as a Backup Remote
While you troubleshoot — or if the remote is truly toast — install the free Roku app on your phone. As long as your phone and Roku are on the same Wi-Fi network, the app becomes a full working remote, complete with a keyboard for typing. It’s the fastest way to keep watching tonight and to confirm your Roku itself is fine and it’s really the remote that’s the problem.
Decoding the Green Light Flashing on Your Roku Remote
That blinking green light freaks people out, but it’s not an error code — it’s a status light, and reading it correctly tells you exactly what’s happening.
A steady green light flashing on your enhanced remote means one thing: the remote is in pairing mode and actively looking for its Roku player. It’s supposed to do that right after you hold the pairing button, or after you pop the batteries back in. If it flashes, connects, and stops within 30–60 seconds, that’s the system working perfectly.
The problem is when it flashes forever. A green light that never stops means the remote is calling out and nobody’s answering — and there are only a few reasons for that. Either the Roku player isn’t fully powered on to receive the handshake (power-cycle it — unplug 10 seconds), or the batteries are too weak to complete the connection (fresh cells), or the remote and player have drifted out of sync and need the full 60-second reset above. Wireless interference from a crowded 2.4GHz band can also stall it, so move the Roku away from routers and microwaves if the flashing persists.
Watch out: A green light that flashes a couple of times and then goes dark — rather than blinking steadily — usually points to dying batteries, not a pairing failure. The remote has just enough power to attempt the handshake but not enough to finish it. Don’t run the full reset gauntlet before you’ve tried a fresh pair of batteries; you’ll waste your evening on the wrong problem.
What “No Light and No Pairing Button” Actually Tells You
Two of the most-searched Roku symptoms — no light and no pairing button — are actually clues that point in opposite directions, and reading them right saves you a ton of guessing.
No Light on the Remote at All
If your enhanced remote shows no light when you press the pairing button — nothing, dead — the story is almost always power. Confirm the batteries are seated correctly (the little diagram in the compartment matters more than you’d think), then replace them with a brand-new pair from a fresh pack. Here’s the trap: batteries straight out of a drawer can be duds even if they were “never used,” and a remote left in a hot or humid spot can corrode its contacts. Clean the metal contacts with a dry cloth or a pencil eraser, reseat good batteries, and try again.
Caveat: A simple IR remote has no persistent status light for its regular buttons at all — the IR emitter fires invisibly. So “no light” on an IR remote isn’t diagnostic the way it is on an enhanced remote; you can’t judge an IR remote by looking for a glow. That’s exactly what the phone-camera test in the next section is for.
No Pairing Button Anywhere
This one’s a gift, because it answers the question for you. If you’ve checked the battery compartment, the back, and the bottom edge and there’s genuinely no pairing button, your remote is a simple IR remote. That means every “hold the pairing button” instruction is irrelevant to you, and the real culprit is one of three physical things: dead batteries, something blocking the line of sight between the remote and the Roku’s IR window, or the remote’s IR emitter having failed. Stop hunting for a pairing menu that doesn’t exist and go straight to line-of-sight and batteries.
Tip: No pairing button also means you can’t “reset” the remote in software — but many buttonless IR-style remotes can still be jolted by removing the batteries, pressing every button twice to drain residual charge, then reinserting fresh batteries. It costs nothing and occasionally revives a remote that’s gotten confused.
Fixing an IR Remote That Won’t Talk to Your TV or Roku Stick
IR remotes fail in boringly physical ways — which is good news, because physical problems have physical fixes. If yours is the plain, no-pairing-button kind, here’s where the real issues live.
Clear the Line of Sight to the Roku Player
Infrared is light. It can’t go around corners, through cabinet doors, or past the stack of mail you set in front of the TV. Stand where the remote is, look at your Roku player, and make sure you can actually see its front face. Media consoles with smoked-glass doors are notorious for blocking IR while looking perfectly open. Move the obstruction or reposition the Roku so there’s a clean sightline, and a “dead” remote often springs back to life instantly.
Give a Buried Roku Stick Its IR Extender
This is the specific gotcha for a roku remote not working with a Roku Streaming Stick. The stick plugs directly into an HDMI port, which usually means it’s crammed into the back or side of your TV — with its IR receiver pointed at a wall. Roku ships a short HDMI extender cable in the box precisely for this: it lets the stick dangle where its IR receiver (and the TV-control IR blaster) can actually see the room. If you skipped that cable during setup, dig it out and use it. It’s the single most common reason a stick’s remote seems flaky.
Fix: A Streaming Stick draws its power over USB, and a weak or underpowered TV USB port can brown it out — the whole device gets unstable and the remote appears to drop constantly. Plug the stick into the included wall power adapter instead of the TV’s USB port. A properly powered stick fixes a shocking number of “random remote” complaints.
Run the Phone-Camera Test to Prove the Emitter Works
Here’s a community-favorite diagnostic that isn’t in Roku’s official steps but works beautifully: open your phone’s camera app and point the front of the remote (the emitter end) straight at the lens, then press and hold any button. Most phone cameras can see infrared light that your eyes can’t, so a working emitter will show up on your screen as a flickering white or purple flash. See the flash? The remote is transmitting fine and your problem is line-of-sight or the Roku itself. No flash at all, with fresh batteries in? The emitter has failed and it’s time for a replacement remote.
Note: This test only works on IR remotes, and even then only on the front-facing IR emitter. Enhanced RF remotes send their navigation commands over radio, which a camera can’t see — so a “no flash” result on an enhanced remote means nothing. Match the test to the remote type or you’ll misread it.
Why the Volume and Power Buttons Fail on Their Own
This is the scenario that confuses everyone: your arrows and OK work perfectly, you can navigate menus all day — but the volume and power buttons do nothing. If that’s you, breathe easy, because it tells you something reassuring.
The volume and power buttons on a Roku remote drive your TV, not your Roku. They’re a completely separate subsystem. On most remotes those buttons send infrared to your television directly, or they route commands through HDMI-CEC — the standard that lets one HDMI device control another. Either way, they have to be programmed to your specific TV, and that programming is independent of the RF link that runs your navigation.
So here’s the logic that solves it: if your navigation buttons work, your remote is paired and healthy. The RF link is fine. A volume button that’s dead while navigation works can’t be a pairing problem — it’s a TV-programming problem. The fix is to re-run the remote’s TV setup (Roku will walk you through a quick volume/mute test), or to check that HDMI-CEC is switched on in your TV’s settings.
Caveat: Every TV brand hides CEC under a different marketing name — Samsung calls it Anynet+, LG calls it SimpLink, Sony calls it BRAVIA Sync, Vizio calls it CEC, Hisense calls it something else again. If your volume buttons stopped after a TV software update or a new HDMI cable, that CEC setting is the first thing to check, and you’ll be hunting for the brand name, not the word “CEC.”
Getting Your Roku Remote Working With the TV Again
“Not working with the TV” is really the same TV-side story as the volume buttons, just broader — and once you see it that way, the fix is clear. When the remote controls Roku fine but won’t turn the TV on and off or adjust volume, you’re dealing with the IR-or-CEC bridge to your television, not the Roku connection.
Run through this: re-run the remote’s TV control setup from Settings → Remotes & devices → Remote → Set up remote for TV control, which retests the volume and power commands and re-learns your TV. If you use the direct-IR route, make sure the front of the remote has a clear line of sight to the TV’s IR sensor (usually along the bottom bezel). If you rely on CEC, confirm it’s enabled on both the Roku (Settings → System → Control other devices → 1-touch play and System audio control) and on the TV under its brand-specific CEC name. A surprising number of “won’t control my TV” cases are just CEC quietly switched off on one end.
For a wider view of how these HDMI-CEC handshakes tie your living-room gear together — and why one flaky setting can cascade — our guide on how to set up a smart home for beginners walks through the same control logic across devices. And when you want the authoritative button-by-button steps for your exact model, Roku’s own remote troubleshooting page is the source of record.
Bottom line: If the remote runs Roku but not the TV, never touch the pairing button — you’ll break a working RF link chasing a TV problem. TV control and Roku control are two different roads; fix the one that’s actually out.
When It’s Time to Just Replace the Remote
Sometimes the honest answer is that the remote is done. You’ve put in fresh, confirmed-good batteries. You’ve re-paired (enhanced) or cleared line-of-sight and run the phone-camera test (IR). You’ve power-cycled the Roku. And it still won’t respond. At that point you’re not troubleshooting anymore — you’re delaying a cheap replacement.
The good news is Roku makes this painless. A replacement enhanced Voice Remote is one of the cheaper things Roku sells and pairs in seconds. And in the meantime, the Roku mobile app is a genuinely full-featured stand-in, not a toy — plenty of people run their Roku from their phone permanently and never look back. Know when you’ve crossed from “fixable” to “replace it,” and you’ll save yourself an evening of frustration.
Frequently Asked Questions
How do I know if my Roku remote is IR or enhanced?
Flip it over and look for a pairing button in the battery compartment or on the back, and check the face for a microphone or voice button. Both of those live only on enhanced RF remotes. If there’s no pairing button and no mic — just a D-pad and playback keys — you’ve got a simple IR remote, and it works by line-of-sight infrared with no pairing involved.
My Roku remote still isn’t working with new batteries, so now what?
First, confirm the “new” batteries are actually good; fresh-from-the-pack duds are more common than people expect, so try a different pair. Reseat them per the compartment diagram and clean the metal contacts. If it’s an enhanced remote, re-pair it by holding the pairing button about 5 seconds. If it’s an IR remote, run the phone-camera test to see whether the emitter is even firing — a dead emitter with good batteries means the remote itself has failed.
Why is my Roku remote’s green light flashing and not stopping?
A steadily flashing green light means the remote is stuck in pairing mode, searching for a player that isn’t answering. Make sure your Roku is fully powered on, then do the full reset: batteries out for 60 seconds, unplug the Roku for 10 seconds, power both back up, and re-pair. If the green light instead blinks a couple of times and dies, that’s weak batteries, not a pairing failure — swap them first.
There’s no pairing button on my Roku remote, so is it broken?
Not at all — it means you have a simple IR remote, which doesn’t pair by design. It connects by line-of-sight infrared, so any “hold the pairing button” advice simply doesn’t apply to you. Focus instead on fresh batteries and a clear, unobstructed path between the front of the remote and your Roku’s IR window.
Why do only the volume and power buttons on my Roku remote not work?
Because those buttons control your TV, not your Roku, through a separate system (direct IR or HDMI-CEC). If your navigation buttons work, your remote is paired and healthy — the volume and power failure is a TV-programming issue. Re-run the remote’s TV control setup, and check that HDMI-CEC is enabled under your TV’s own name for it (Anynet+, SimpLink, BRAVIA Sync, and so on).
Why does my Roku Streaming Stick remote keep dropping out?
Usually one of two physical things. The stick is often buried in an HDMI port with its IR receiver facing a wall — use the included HDMI extender cable so it can “see” the room. And a stick powered from a weak TV USB port can brown out and make the remote seem flaky; plug it into the included wall adapter instead. Both fixes clear the most common stick-remote complaints.