Here is the whole trick in one breath. Go to Settings, tap Control Center, and add Screen Recording. Swipe into Control Center, tap the record button, and wait out the three-second countdown. Everything on screen is now captured, and the clip lands in Photos when you stop. That is all there is to how to screen record on iPhone — and it is also why so many people are back in a search box an hour later. The button is the easy 10 percent. The other 90 percent is knowing which audio your phone keeps: the app’s sound, your voice, or nothing at all. Get that wrong and you record a perfect, useless, silent video. Let’s make sure that never happens.
- The record button is not on your phone out of the box. Add it once in Settings, then Control Center, and it lives there forever.
- Your iPhone grabs app sound on its own. Your voice only records if you long-press the record button and switch the Microphone on.
- That mic switch is sticky. It stays however you left it last time, which is exactly how people record a big moment in total silence.
- Netflix and most streaming apps come out as a black screen. That is copy protection doing its job, not your phone breaking.
- Every clip saves to Photos, and trimming off the messy start and end takes about ten seconds.
Turn the Screen Recorder On in Under a Minute
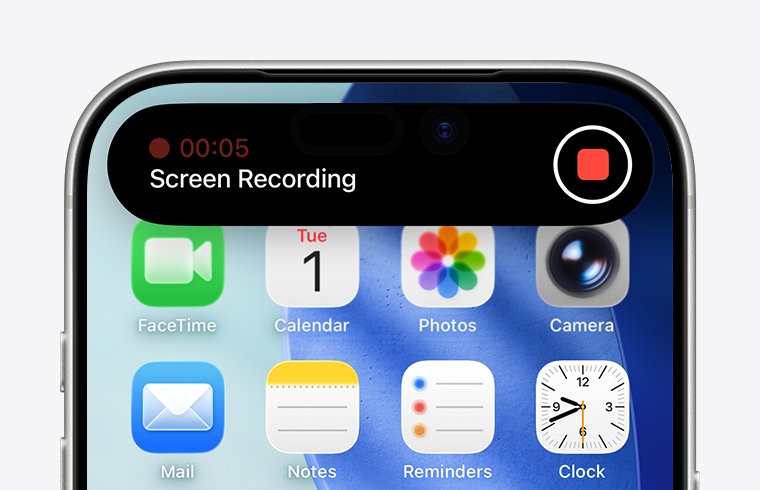
The recorder ships hidden. You unlock it once, and after that it is always two swipes away.
- Step 1 — Add the button. Open Settings, tap Control Center, and tap the green plus next to Screen Recording. One-time setup.
- Step 2 — Open Control Center. On a Face ID iPhone, swipe down from the top-right corner. On a home-button model, swipe up from the bottom edge.
- Step 3 — Tap record. Hit the circle-in-a-circle icon. You get a three-second countdown, then the clock area turns red to show you are live.
- Step 4 — Stop. Tap that red clock or status bar and confirm Stop. You can also reopen Control Center and tap the button again.

These are the same steps Apple’s own support guide lists.
Tip: Stop from the red status bar, not Control Center. Reopening Control Center films your own menu-fumbling — extra seconds you will just have to trim off later.
Where the Video Lands and How to Trim It
Every recording drops straight into the Photos app with your other videos. To clean one up, open the clip, tap Edit, and drag the yellow handles at either end to cut the dead air. Tap Done and choose whether to save it as a new clip or overwrite the original. Saving as a new clip keeps the full take as a backup — the smart move for anything you cannot re-record.
Which Audio Your iPhone Actually Records
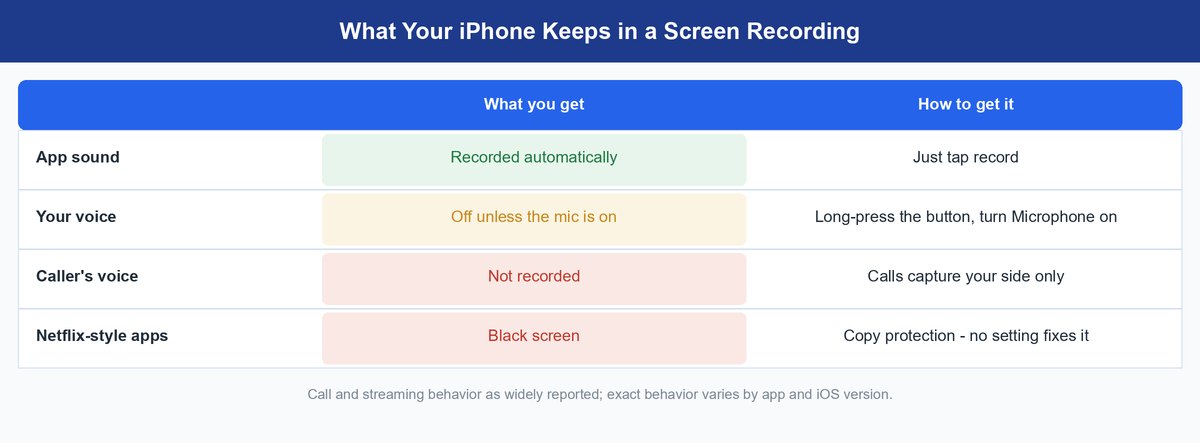
This is what separates a usable clip from a silent one. Your iPhone treats sound as three separate things, and each follows its own rule.
App Sound Is Captured on Its Own
Game audio, a video playing in an app, a voice memo on playback — sound from inside your phone is recorded automatically. You touch nothing. If all you want is gameplay with its own sound, the plain record button already does the job.
Your Voice Needs the Long-Press Mic Trick
Want to talk over the recording? Press and hold the Screen Recording button instead of tapping it. A panel pops up with a Microphone button at the bottom. Tap it on, then start recording. Now your phone captures the screen, the app sound, and your voice all at once. This is the single most missed step in the whole process.
Heads up: The Microphone setting keeps its last state between recordings. If you muted it last month, it is still muted today. Long-press and check the mic every time something actually matters.
Calls Record Your Side Only
Hoping to capture a FaceTime or WhatsApp call? Temper your expectations. In our checks of published guidance, call apps record your mic but not the other side’s audio — when they allow recording at all. Treat any call recording as your-voice-only, and tell the other person. Depending on where you live, recording someone without consent can be a legal problem, not just a rude one.
Why Netflix Records as a Black Screen
Try to screen record Netflix and you will likely get a full-length video of nothing. Reporting from How-To Geek traces this to system-level copy protection — DRM schemes like Widevine and PlayReady that streaming apps use to stop shows from being copied. The app tells iOS the picture is protected, and iOS blanks it out of any recording or screenshot. Audio sometimes slips through, which makes the black clip feel even more like a glitch. It is not one. It is intentional, it covers most paid streaming apps, and no setting on your phone turns it off. If a recording comes out black, that app is protected — record something else and save yourself twenty minutes of pointless rebooting.
Fix the Three Most Common Recording Problems
When a recording goes wrong, it is almost always one of these three. Each has a fast fix.
The Screen Recording Button Is Missing
You swiped into Control Center and there is no record button. Nothing is broken — the button was never added, or got removed. Go to Settings, tap Control Center, and tap the green plus next to Screen Recording. It appears instantly, no restart needed.
The Recording Stops on Its Own
A recording that quits early usually means your phone ran out of room. Check Settings, then General, then iPhone Storage, and free up space before a long session. Users also widely report an incoming call interrupting a recording, so Do Not Disturb is your friend when the take matters.
Watch out: Screen recordings commonly run tens of megabytes per minute, depending on resolution and what is on screen — a rough estimate, not a spec. A long session can quietly eat a gigabyte, so check your free space first.
The Finished Video Has No Sound
Silent clip? Run this list in order. First, long-press the record button and check whether the Microphone was off — that kills your voice track. Second, ask whether the sound came from a protected app; DRM can block audio too. Third, if it was a call, you only ever get your own side. Nine times out of ten, the sticky mic switch is the culprit.
The Bottom Line on Silent Recordings
Anyone can start a screen recording — three taps and a countdown. The people who never re-record are the ones who long-press first, glance at the Microphone setting, and know which apps will black out before they try. Make that check a habit and the silent-video problem disappears for good. While you are in fix-it mode, our guides on how to find your Wi-Fi password and how to clean a phone charging port knock out two more everyday tech headaches.
Frequently Asked Questions
How do you screen record on an iPhone with sound?
Add Screen Recording in Settings, then Control Center. App sound records automatically. For your voice, press and hold the record button in Control Center, tap Microphone so it turns on, then start recording.
Why does my iPhone screen recording have no sound?
The usual culprit is the Microphone toggle, which stays however you left it last time. Long-press the record button and check it. If the mic was on, the app you recorded may be copy-protected, which can block audio too.
Where do screen recordings go on an iPhone?
Straight into the Photos app, alongside your regular videos. Open the clip and tap Edit to trim the start and end before you share it.
Why is my screen recording black when I record Netflix?
Streaming apps use copy protection that tells iOS to blank the picture in recordings and screenshots. It is deliberate, it covers most paid streaming services, and no setting on your phone changes it.
Can you screen record a FaceTime call with audio?
Only partly. Based on published guidance, the recording captures your mic — not the other person’s voice. Also check your local laws and get consent before recording anyone.
How much storage does an iPhone screen recording use?
There is no fixed number, but recordings commonly run tens of megabytes per minute depending on resolution and content. Treat a long session as a gigabyte-scale event and check your free space first.